If you’ve never discovered the fun of felting, these easy, step-by-step instructions will show you how. Included are instructions for two colorful, eye-catching felted crochet purses to stitch using either 100 percent wool or wool-blend yarn.
Felted Crochet Handbags

What is felting? Felting is a process by which wool fibers are tightened into a dense, strong material that is incredibly tough and long-wearing. Several ancient cultures used felted wool to make their shelters during their travels. Felting is also what happens when a favorite wool sweater gets turned into something resembling a pot holder. Unplanned and uncontrolled, felting is a bad thing. However, with planning, control and a great choice of colors, felting is a fabulous way to make useful, fun objects and terrific gifts.
The most important part of felting is the choice of yarn. Felting only works with animal hair fibers that have not been chemically treated to be washable. The best fiber for felting is wool. A wool/mohair blend also works very well, with slightly different results.
Blends that contain acrylic or any other fibers generally will not work with felting. Any yarn that says “superwash” on the label will never felt. Both Brown Sheep and Cascade produce excellent feltable yarns that come in a large assortment of colors.
Brown Sheep’s Lamb’s Pride yarns are an 85 percent wool/15 percent mohair blend. These yarns work well with felting and they will felt with a nice dense texture that tends to be thicker and fuzzier because of the mohair in the blend. Some of the heathered colors will be especially fuzzy and are a great choice for furry projects like slippers or stuffed toys.
Cascade’s 220 Wool is 100 percent wool. It felts to a smoother surface that is great for things with a more tailored look, like nice square corners on a tote bag. 220 Wool also comes in heathers (220 Wool Heathers) and in a series of marled or two-color plied yarns (220 Wool Quatro) that give a tweedy look when felted.
The second most important part of felting is the way you stitch your project. Because crochet already tends to be dense in structure, it needs to be opened up more for proper felting.
If a medium (worsted) weight yarn, normally used with a size G or H hook, is felted, the resulting texture will bear a strong resemblance to plywood. If the same yarn is crocheted with a size J hook, it will look too loose and have gaps showing between the stitches before felting, but will felt to a closed up, dense fabric with a nice hand. Stitch choice also affects the result.
Single crochet will tend to be stiffer and double crochet might still have a few gaps. Half double crochet is the proverbial “just right” stitch for most projects, having a nice hand and flexibility, but no gaps.
In theory, almost any small-project pattern can be turned into a feltable pattern if the hook size is changed and a good felting yarn is used. If you choose to convert a pattern, plan to make a test piece before committing a lot of time and yarn as the other variables in the felting process can also affect results.
Once a piece is completed, it’s time to go to the washer. Using a washing machine is the easiest way to felt unless the sample is very small. Placing the project into a zippered pillow cover prevents any fibers from getting into the washer and also protects things like purse straps from getting caught and stretched. Add a few towels for help in agitation and load balance. Use half the soap needed for a normal load. A gentle soap is best, but used in smaller quantities, regular laundry soap will also work. Set the load for the hottest water available for the wash cycle and a cold rinse. Turn it on and let it go.
One of the creative parts of felting is that the process can be stopped anytime. A lightly felted or “fulled” fabric with fully visible stitches is achieved after a short cycle in the wash. A fully felted fabric will have no visible stitches at all and can take as may as five washer cycles depending on the washer. Most projects are felted to someplace in the middle, as desired. Check the piece after the first load. Does it have a long way to go, or is it almost where it should be? If it has a long way to go, put it back in the washer and let it go though as many cycles as needed.
If it’s nearly there, put it back in, but stay close and open the washer every few minutes to check the progress. With things like hats, try the damp piece on to see if it fits. If it’s still too large, keep going, when it fits, stop. When the required level of felting is reached, take the project out of the pillow cover and arrange it as needed to dry. Do NOT put it in the dryer, or that fabulous hat for your mother will fit her cat instead! Arrange the items on a dry towel, out of direct sunlight. If it’s something flat like mittens, simply lay them out. For dimensional projects like hats, purses or tote bags, put something inside them that will help hold the desired shape — a bowl under a hat, a plastic-wrapped box of soda cans in a big tote, etc. — a couple of plastic grocery bags work especially well to shape slippers.
This next step is hard … walk away from the project. Let it dry completely — without touching it. On a large project, this can take several days. In a desperate pinch for time, a hair dryer on a low heat setting can be used.
Gauge is normally important, and would normally be discussed much earlier in the project. In felting, gauge is not nearly as important because the piece is purposefully being crocheted in an open, loose manner and then is felted down to the desired size. Gauge has very little effect on fit when a hat that looks like a huge ugly sack 36 inches around is made and then felted down to be an adorable, turned-brim, dressy, winter hat that fits a 221/2-inch head.
A fun thing to try is to include a synthetic, nonfelting yarn, such as a novelty or eyelash yarn as a carry along with the wool. When the wool felts, the synthetic yarn stands up or pops for a great trim. Try it for a furry edge on a hat, stripes on a purse or cuffs on mittens.
Felting can be used for any size project. In general, the larger the amount of yarn, the harder it is to control the process. For example, it is much more difficult to be sure of even results in a large project, like a coat, than it is to be sure of the results in smaller objects like purses, hats or slippers. A whole group of smaller pieces can be felted in one load as long as colors are separated into different pillow covers. It is very satisfying to see several purses or a whole row of pairs of slippers done at one time, lined up drying for family gifts. Have a great time playing with great yarns!

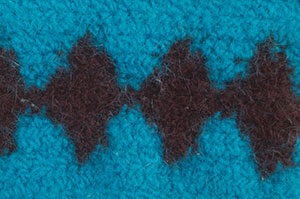
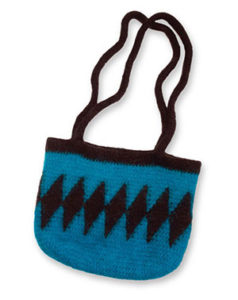
Diamonds swatch: Notice the puckering between the diamonds at the bottom; this sample did not have the thread carries snipped as called for in pattern.
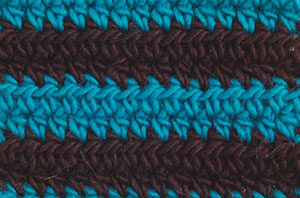
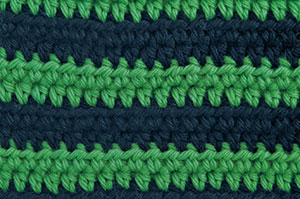
Unfelted “before” half double crochet swatch.
Plain, half double crochet rows: two wash cycles.
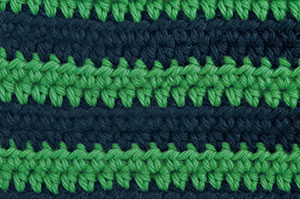
Unfelted “before” half double crochet swatch.
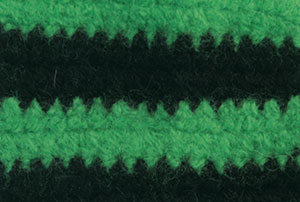
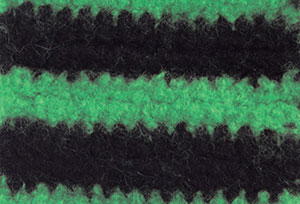
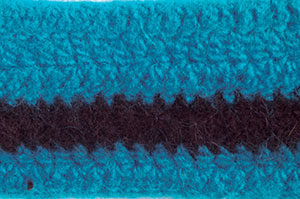
Lightly felted or “fulled”: one wash cycle.

Plain, half double crochet rows: two wash cycles.
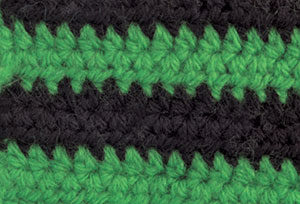
Still further: three wash cycles, notice it’s getting hard to count the stitches.

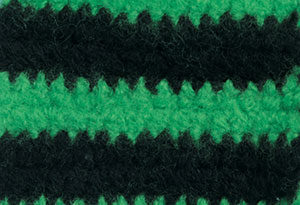
Fully felted: four wash cycles, cannot count the green stitches accurately.
DIAMOND BAG
SKILL LEVEL: Intermediate
FINISHED SIZE
Before felting: 12 1/2 x 16 x 39 inches, including straps
After felting: 10 1/2 x 12 3/4 x 26 inches, including straps
GAUGE
Because this piece will be felted, gauge is not critical. There should be sp showing between sts when bag is held up to the light.
PATTERN NOTES
When changing colors always change in the last stitch made.
Carry yarn loosely across back of work, a finger should easily fit in the carried loop.
The carried yarn will be trimmed later.
The Bag shown was washed through 2 normal length, hot-water/cold-rinse washer loads for this degree of felting.
It is critical that after the first cycle, the thread carries on the inside of the diamond pattern are snipped in the center. These carries will felt faster than the rest of the Bag and will distort the pattern unless snipped. One washer cycle completes enough felting so that no stitches will come apart. After the Bag is dry, trim any remaining bits of the thread carries.
Join with slip stitch as indicated unless otherwise stated.
BAG
Rnd 1: With A, loosely ch 28, working in back lps (see Stitch Guide), hdc in 3rd ch from hook (first 2 sk chs count as first hdc—place marker), hdc in each rem ch across to last ch, 5 hdc in last ch (place marker in first and 5th st), working on opposite side and in rem lps of beg ch, hdc in each ch across with 4 hdc in last ch, (place marker at beg of last 4 sts, you should have 5 hdc between first and last markers around end), join (see Pattern Notes) in 2nd ch of beg ch-2. (60 hdc)
Rnd 2: Sl st in next st, ch 2, [hdc in each st across to first marker, 2 hdc in each of next 5 sts (move markers on each rnd as you work)] around, join in 2nd ch of beg ch-2. (70 hdc)
Rnd 3: Ch 2, hdc in each st across to first marker, [2 hdc in next st, hdc in next st] 5 times, hdc in each st across to marker, [2 hdc in next st, hdc in next st] 5 times, join in 2nd ch of beg ch-2. (80 hdc)
Rnd 4: Ch 2, *hdc in each st across to marker, [2 hdc in next st, hdc in each of next 2 sts] twice, 2 hdc in next st, hdc in next st, 2 hdc in next st, [hdc in each of next 2 sts, 2 hdc in next st] twice, rep from *, join in 2nd ch of beg ch-2. (92 hdc)
Rnd 5: Ch 2, *hdc in each st across to marker, 2 hdc in next st, [hdc in each of next 3 sts, 2 hdc in next st] 5 times, rep from *, join in 2nd ch of beg ch-2. Remove markers. (104 hdc)
Rnds 6-9: Ch 2, hdc in each st around, join in 2nd ch of beg ch-2.
Rnd 10: Ch 2, hdc in same st, hdc in each st around, join in 2nd ch of beg ch-2. (105 hdc)
Rnd 11: Ch 2, hdc in each of next 5 sts, changing colors (see Pattern Notes) to B in last st made, [hdc in next st, changing to A, hdc in each of next 6 sts, changing to B] around to last st, hdc in last st, changing to A, join in 2nd ch of beg ch-2.
Rnd 12: Ch 2, hdc in each of next 4 sts, changing to B, hdc in each of next 2 sts, changing to A, *hdc in each of next 5 sts, changing to B, hdc in each of next 2 sts, changing to A, rep from * around, join in 2nd ch of beg ch-2.
Rnd 13: Ch 2, hdc in each of next 3 sts, *changing to B, hdc in each of next 3 sts, changing to A**, hdc in each of next 4 sts, rep from * around, ending last rep at **, join in 2nd ch of beg ch-2.
Rnd 14: Ch 2, hdc in each of next 2 sts *changing to B, hdc in each of next 4 sts, changing to A**, hdc in each of next 3 sts, rep from * around, ending last rep at **, join in 2nd ch of beg ch-2.
Rnd 15: Ch 2, hdc in next st, *changing to B, hdc in each of 5 sts, changing to A**, hdc in each of next 2 sts, rep from * around, ending last rep at **, join in 2nd ch of beg ch-2.
Rnd 16: Ch 2, *changing to B, hdc in each of 6 sts** changing to A, hdc in next st, rep from * around, ending last rep at **, join in 2nd ch of beg ch-2.
Rnd 17: Ch 2, hdc in each st around, join with sl st in 2nd ch of beg ch-2.
Rnd 18: Ch 2, hdc in each of next 5 sts, *changing to A in last st made, hdc in next st, changing to B**, hdc in each of next 6 sts, rep from * around, ending last rep at **, join in 2nd ch of beg ch-2.
Rnd 19: Ch 2, hdc in each of next 4 sts, *changing to A, hdc in each of next 2 sts, changing to B**, hdc in each of next 5 sts, rep from * around, ending last rep at **, join in 2nd ch of beg ch-2.
Rnd 20: Ch 2, hdc in each of next 3 sts, *changing to A, hdc in each of next 3 sts, changing to B**, hdc in each of next 4 sts, rep from * around, ending last rep at **, join in 2nd ch of beg ch-2.
Rnd 21: Ch 2, hdc in each of next 2 sts, *changing to A, hdc in each of next 4 sts, changing to B**, hdc in each of next 3 sts, rep from * around, ending last rep at **, join in 2nd ch of beg ch-2.
Rnd 22: Ch 2, hdc in next st *changing to A, hdc in each of next 5 sts, changing to B**, hdc in each of next 2 sts, rep from * around, ending last rep at **, join in 2nd ch of beg ch-2.
Rnd 23: Ch 2, *changing to A, hdc in each of next 6 sts**, changing to B, hdc in next st, rep from * around, ending last rep at **, join in 2nd ch of beg ch-2. Fasten off B.
Rnds 24-28: Ch 2, hdc in each st around, join 2nd ch of beg ch-2. At end of last rnd, fasten off.
Rnd 29: Join B in first st, ch 2, hdc in each st around, join in 2nd ch of beg ch-2.
Rnds 30 & 31: Ch 2, hdc in each st around, join in 2nd ch of beg ch-2. At end of last rnd, fasten off. Do not work in yarn ends, they can be clipped off after felting.
STRAP MAKE 2.
Row 1: With B, loosely ch 110, hdc in 3rd ch from hook and in each rem ch across, turn.
Rows 2 & 3: Ch 2, hdc in each st across, turn. At end of last row, fasten off. Sew long edges tog forming a tube. Loosely sew the ends of Strap to desired position inside of Bag, keeping the Strap lined up the full width of the top strip. Loose stitching is needed because these sts will felt a little faster than the rest of the bag and could distort if they get too tight.
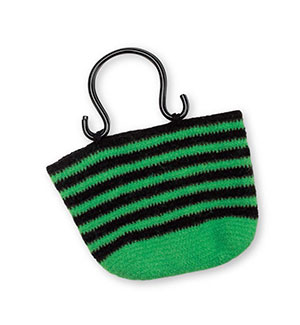
STRIPED BAG
SKILL LEVEL: Intermediate
FINISHED SIZE Before felting: 121/2 x 16 inches After felting: 91/2 x 12 inches
MATERIALS
- Cascade 220 Wool medium (worsted) weight wool yarn (31/2 oz/220 yds/100g per hank): 1 hank each #8555 black and #7814 chartreuse
- Size J/10/6mm crochet hook
- Tapestry needle
- Purse handles
- Stitch marker
GAUGE Because this piece will be felted, gauge is not critical. There should be sp showing between sts when bag is held up to the light.
PATTERN NOTES
The Bag shown was washed through 4 normallength, hot-water/cold-rinse washer loads for this degree of felting.
Join with slip stitch as indicated unless otherwise stated.
BAG
Rnd 1: With chartreuse, rep rnds 1-9 of Diamond Bag. Remove markers. (104 hdc)
Rnd 10: Ch 2, hdc in each st around, join in 2nd ch of beg ch-2. At end of last rnd, fasten off.
Rnd 11: Join black in first st, ch 2, hdc in each st around, join in 2nd ch of beg ch-2.
Rnd 12: Ch 2, hdc in each st around, join in 2nd ch of beg ch-2. Fasten off.
Rnd 13: Join chartreuse with sl st in first st, ch 2, hdc in each st around, join in 2nd ch of beg ch-2.
Rnd 14: Ch 2, hdc in each st around, join in 2nd ch of beg ch-2. Fasten off.
Rnds 15-32: [Rep rnds 11–14 consecutively] 5 times, ending last rep with rnd 12. At end of last rnd, fasten off. Felt to desired degree. When drying, put several round cans, such as soup or vegetable cans, in bottom to help maintain flat bottom with rounded ends shape. This purse is more fully felted than the Diamonds Bag. After drying, clip any ends, add the handles. Attach handles according to manufacturer’s instructions.