Color Magic Secrets for Crochet by Darla Sims

If there is anything that is truly magical not only in crochet but in life itself, it’s color! In everyday life, people often give very little thought to color, yet responses to color are very real and can be scientifically measured. Although often the last thing on one’s mind, color influences many day-to-day choices, and that makes it something important to consider when you’re choosing color for your crochet patterns.

Color Psychology for Crochet and Real Life

Let’s take a step back from the world of crochet and talk about how color is used in real life. Manufacturers and merchants spend billions of dollars to capitalize on our responses to color because they know colors influence what we buy, how much we eat, as well how as how we are likely to feel and respond to their products in other ways. For example, red is often used in the decor of a fast-food restaurant because red stimulates and increases your appetite, so you’ll spend more money on food when surrounded by red, and you’ll be subconsciously dissuaded from lingering over the meal. Both red and yellow catch the eye and are used on food labels to stand out enticingly on store shelves, making them more visually appealing to the shopper.

When it comes to choosing yarn colors, it’s easy to become confused at the vast array of offerings in any store. Take the guesswork out of yarn choices for your next project with a small investment in a color wheel, a purchase that will almost guarantee you’ll never make another color error again! Craft stores offer color wheels that are small and flat enough to slide into most handbags.

Color Basics for Crochet

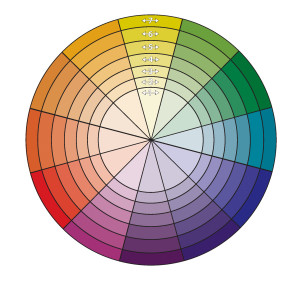
Instructions included with the color wheel shown here are simple and easy to grasp. To begin, choose a color of yarn, such as red, and then match the shade and the color number on the color wheel as closely as possible. As you rotate the inner wheel, notice how the symmetrical spacing and cutout shapes automatically indicate harmonious combinations. For example, if the color value of your red is No. 4, the arrows on the inner wheel point to opposite and complementary shades to use with your red, all of which also have a value of No. 4.

The more your project combines colors with one another, the more sophisticated and fashion oriented they become. In addition, the value of a color is deepened when mixed with black and becomes lighter when mixed with white. The next step/nuance would be to add gray to create more hues.

Color Properties: Value & Visual Weight and How to Use Them in Crochet

In looking at the color values shown in Fig. 2, the primary colors of blue, yellow and red in Tier 1 cannot be mixed from other colors. The secondary colors in Tier 2 result from mixing two primary colors together: blue + red = purple; yellow + blue = green; red + yellow = orange. The tertiary colors in Tier 3 result from mixing one primary color with one adjacent secondary color: yellow/green, blue/green, blue/purple, red/purple, red/orange and yellow/orange.

ColorMagicSecrets_Fig2

When selecting yarn colors,  two properties must be taken into consideration: the value of the colors and the visual weight. The lighter the color, the less it appears to weigh visually, while the darker the color, the heavier it seems. The most eye-catching color combinations are those that are the most opposite in value and weight, such as black and white, as well as other primary or strong colors combined with white. These opposites really stand out in your crochet projects.

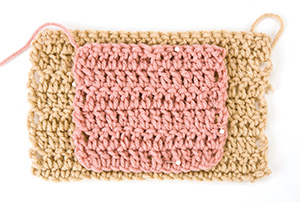
The most soothing combinations are monochromatics, but they can also be made to pop when one hue is very strong. For example, if you make a sweater in shades of tan, and then work the edging, collar or ribbing in a dark brown, the dark brown stands out and makes a strong, appealing statement. The goal is to achieve visual balance while using harmonious shades. Without a color wheel, this can be a daunting, risky task.

The Best Colors to Wear: Choose Yarn Color Wisely for Your Crochet Clothing

When it comes to colors, those we use in home decorating are not necessarily the most flattering when it comes to clothing. The colors a person wears should complement one’s eyes, hair and skin coloring to be truly flattering. Colors fall into two basic groupings: warm and cool. Warm colors have golden undertones, while cool colors are based on blue. If your skin undertone is slightly blue (cool), then warm hues such as corals, oranges and rusts probably shouldn’t be in your personal color palette for crochet clothing because they are visually discordant with your skin tone.

If your undertone is warmer, cool blues and lavenders will tend to make you look wan and washed out.

Generally speaking, yellow is the single most difficult color to wear. If yellow is a color you truly love, choosing the right shade for your clothing will make all the difference. If your skin coloring is warm, select a banana shade that has a bit more red than lemon yellow, which is a slightly harsher yellow with green undertones. If your skin tone is cool, then opt for yellows with hints of greens or blues.

If you haven’t yet discovered the secret of the two easiest-to-wear colors (regardless of your own skin, hair and eye colors), just give turquoise and coral a try in your crochet clothing projects! Before long, someone is sure to say, “Wow! That is so your color!” These clear colors have perfectly balanced values and are flattering for everyone. When you look at or wear either of these two colors, your psychological response is an automatic lifting of spirit — making you feel good while you’re looking good.

For more information about the psychology of color, look up one of the many books available on the subject. The enlightening information found therein will take your ability to choose the right colors for your crochet clothing to an entirely new level.

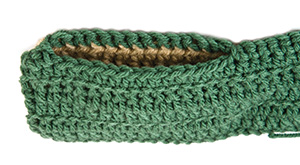
Monochromatic color schemes always work when it comes to clothing or home decorating, as long as you begin with a basic yarn color for your crochet project that flatters your own coloring. By varying the hues of the basic color, you add visual interest and impact. The more varied textures are introduced along with varied shades, the more sophisticated, interesting and pleasing you’ll find your final crochet project. For example, if you love green, try mixing and matching any shades from the lightest to darkest in varied amounts for the most impact, using one shade as an accent to optimize your end result.

The most sophisticated and difficult monochromatic color palette for crochet projects (and any project, for that matter) is undoubtedly that of neutrals: creams, grays and tans. Color wheels are unable to break down the intricate values of neutrals. It takes an expert eye and knowledge to maintain the shading and visual balance of these subtle color changes and hues.

If you truly love neutrals and want to incorporate them into your crochet projects, go to your local home-improvement store and gather up paint chips to take home and study. Most paint manufacturers make it easy for you as they show color palettes in families with predetermined and matching values. For starters, look at the pale creams and you’ll immediately notice distinct differences. Some chips have strong undertones of green or blue, while others are more yellow or orange; yet others have hints of brown or black. This is understandable because white is actually a combination of all colors, not an absence of color, and cream is just a subtle darkening of white.

Color Trends: Going Beyond Crochet

When it comes to color, trends are not based on strong and growing demand for certain colors; rather, they are based on the findings from focused worldwide networks. Participants of these groups come from varied walks of life. Each member follows and studies such things as sports, politics, economics, music, arts, cuisine, leisure activities, decorating, fashion, the environment and cultural diversity, just to name a few. Each aspect of study provides useful information that allows the collective group to forecast colors with validity. When the core group comes to consensus, color chips are then developed and distributed to designers and manufacturers who further develop their own forecast for trends for yarn, fabric, paint, clothing, furniture and the like.

From season to season the hues of core colors change slightly to reflect worldwide changes as they occur within focus groups. Colors then become stronger, more muted or more convoluted to reflect global changes.

How drab the world would be without the magic of color. It is truly something to celebrate and enjoy! Thank goodness that the secrets of color can be revealed to enhance our crochet projects with a simple little color wheel.

Leave a comment


Crochet Pocket Panache

CROCHET POCKET TYPES

Crochet pockets can be a useful addition to any sweater. Not only are they practical, but they can also add a bit of detail to an otherwise plain sweater. The most common pocket types are patch, horizontal slit or vertical slit.

Patch pockets (see Photo A) are simple square or rectangular pieces which are crocheted first, and then sewn onto the sweater fabric. While the patch pocket may be the easiest to make, you must use extreme care when sewing the crochet pocket onto the fabric. The seam should be nearly invisible, and the crochet pocket must be placed exactly on the grain of the fabric.

Horizontal-slit or vertical-slit crochet pockets, also known as horizontal-inset (see Photo B) or vertical-inset pockets, have a single or double lining which is crocheted first, and then incorporated into the body of the sweater as it is worked. The double lining is generally used for finer-gauge fabrics and does not require that the inside of the pocket be sewn onto the sweater. The single lining is better suited for heavier yarns and must be sewn onto the wrong side of the sweater fabric. A pocket-opening border is usually added after the sweater is complete. This type of pocket has the advantage of being mostly hidden — the only part of the pocket that shows once the crochet sweater is completed is the border. The crocheter who is uncomfortable with finishing work on the “public” side may be more satisfied with an inset pocket.

Photo A

PhotoA

PATCH CROCHET POCKET

  1. Crochet a piece of fabric to the desired size and shape. Use a simple square or rectangle, and experiment with unusual shapes or motifs, or try a 3-D piece.
  2. Pin the pocket onto right side of the crochet sweater. Take care to pin it straight both horizontally and vertically.
  3. Working on the right side, invisibly stitch the pocket onto the crochet sweater. For a decorative look, try a whipstitch or a blanket stitch using a contrasting color of yarn.

Photo B

PhotoB

HORIZONTAL-INSET CROCHET POCKET

  1. Crochet the pocket lining in either the pattern stitch used in the sweater or in single crochet. The pocket lining should be unobtrusive yet functional. Stay away from any pattern stitch that will add excess weight or texture, or any that is too “holey” to be practical.
  2. Crochet the sweater to the desired length. The pocket should be positioned so that it is comfortable for the wearer’s hand. The placement of special or decorative pockets, such as a watch pocket, may be somewhat different.
  3. Referring to the crochet sweater directions, work in the pattern the required number of stitches until you get to the pocket opening. Sometimes crochet pockets are placed in the center of the piece, and sometimes to one side. The pattern instructions will state how many stitches to crochet.
  4. Holding the pocket piece behind your work-in-progress, crochet in pattern across the top of the pocket piece rather than into the main fabric. The number of stitches you work across the pocket and the number of stitches you skip on the main-fabric will probably be the same as the number you used in your pocket lining.
  5. Continue working into remaining fabric stitches to the end of the row, keeping in the established pattern. At this point, you have joined the pocket lining to the fabric of the crochet sweater. There is a hole in the main fabric and the lining is loose against the back of the fabric.
  6. Continue crocheting the sweater as directed. Then fasten off your yarn.
  7. When the crochet sweater is complete, work the desired border (if any) along the top front pocket edge.
  8. Sew the side and bottom edges of the crochet pocket lining to the back of the fabric. If necessary, sew side edges of the border to right side of fabric.

VERTICAL-INSET CROCHET POCKET

  1. Crochet the sweater to the desired length between the bottom of the sweater and the bottom of the crochet pocket, ending with a wrong-side row.
  2. Referring to the sweater directions, crochet in the pattern across the required number of stitches to make the pocket opening, leaving remaining stitches unworked. Vertical crochet pockets are placed so that they lie toward the center of the garment. The crochet sweater pattern’s instructions will state how many stitches to work.
  3. Turn the work and continue to crochet in pattern on the stitches just worked until the sweater reaches the desired height of the pocket opening, ending with a wrong-side row. Drop the loop from the hook. Do not fasten off. Place a pin in the stitch as a holder.
  4. With a new strand of yarn, chain the number required to match the width and stitch pattern of the crochet pocket front, turn and work the first row of the stitch pattern. Turn and place a marker. You will end by crocheting a right-side row. The stitch pattern used for the pocket lining should have the same row gauge as the main fabric.
  5. With the same yarn, crocheting in the stitch pattern, work in the pocket lining stitches and in unworked stitches from sweater body, turn.
  6. Crochet in the stitch pattern across sweater body and pocket lining, turn. Continue working as stated until sweater body and pocket lining match height of pocket front, ending with a wrong-side row.Fasten off.
  7. Put the dropped loop back on the hook. Leaving pocket lining stitches unworked, crochet in the stitch pattern across the pocket front stitches and across stitches on the crochet sweater body.
  8. Continue crocheting sweater as directed.
  9. When sweater is complete, crochet the desired border, if any, along the front edge of the crochet pocket.
  10. Sew side, top and bottom edges of the pocket lining to the back of the fabric. If necessary, sew the top and border edges of border to right side of fabric.
Leave a comment


Crochet Hook Sizes

To say the least, crochet hooks come in many, many shapes and sizes. There are very fine steel hooks, used with threads to make intricate doilies and other fine lace designs. There are also very large hooks, made of plastic or wood, used to create bulky yarn projects, like rugs, afghans, or sweaters.

Although hooks made for use with yarn can be made from several different materials, usually they are made from aluminum. Their sizes are about 6 inches long and are sized by number and letter, as such: B/1/2.25mm(smallest) up to N/P/15/10mm(largest).

It is of the utmost importance that every single stitch is made on the working area. Never stitch on the throat (stitch is too tight). Never on the finger-hold (stitch would be stretched). Generally, there are 2 ways to hold your hook: The “pencil” hold (photo A) or the “knife” hold (photo B).


PencilHold


KnifeHold


In reality, there is no “wrong” or “right” way to hold your hook. The best way to hold your hook is whatever way is most comfortable for you to work with. Try to hold it firmly, but not too tight, so as to avoid any discomfort or cramping in your hand. The end of the hook should be turned slightly toward you, facing neither up nor down.

You can also hold steel crochet hooks, for use with threads, either way and they should be worked in the same manner. One thing to remember is that steel hooks are sized by letters only – never by numbers. The difference in sizing in yarn hooks and thread hooks, is that the smaller the number for yarn hooks, the smaller the size of the hook. For thread hooks, the higher the number hook, the smaller the size. Something to keep in mind!

Over time, crocheters might develop a preference for a particular style of crochet hook. Always remember, working with hooks that are most comfortable and function for you personally, will guarantee enjoyment and satisfaction with your creations!

MetalHooks

Leave a comment


Lending a Hand… to Left-Handed Crocheters

Quite often, it can be a bit frustrating to be a left-handed crocheter in a predominantly right-handed world! So, why would us south-paws consider ourselves living in a “right-handed world”? Well, for starters only 10% of the global population is left-handed and most of those are men. Since most crocheters are female, we’re talking about a very small minority!

To make matters worse, finding the right info to help lefty crocheters is darn near impossible, because there just hasn’t been that much material written for us. Heck, even some of the most widely circulated crocheting books and tutorials would suggest that lefties should learn to crochet right-handed! No wonder it seems like there is little hope for left-handed crocheters.

A popular method for teaching left-handed crocheting is to sit across from someone crocheting right-handed or to crochet while you facing directly at a mirror. However, left-handed crocheting can be just as simple as learning anything else – it all comes down to repetitive, diligent practice and a no-quit attitude. Focus on getting past the first feelings of awkwardness with the hook and yarn. Practice makes perfect! No big secret there, right?

Let’s Get Started

The first thing we need to work on is how to hold your crochet hook. The hook will be in your left hand and the yarn or thread will held in, and worked with, your right hand. There are two common ways to hold the crochet hook. For starters, we have the “pencil-hold”, where the crochet hook is placed between your thumb and index fingers. The next hold is called the “knife-hold”. This is a grip similar to how you would hold a knife. It will be up to you to decide which “hold” is right for you. There is no right or wrong hold to use. Do what is the most comfortable for you.

We briefly touched on the “holds” for your crochet hook, now we’ll take a look at the “holds” for your yarn or thread. What is most common? That would be looping the yarn or thread around your right-index or middle fingers and holding it loosely over your hand. Then, make a slip-knot on your hook with your yarn.

Next, hold the slip-knot between your thumb and middle finger of your right hand. The yarn should come out between the hook and your index finger. Using your index finger, keep the yarn tight, in order to create and even tension. This tension is important to maintain, if you want to maintain even stitches. Looping the yarn over the hook is called a “yarn-over”. This is also the way to create stitches and/or chains. The abbreviation, “beg/foundation ch”, is how we describe the beginning of a crochet.

With the hook in front, yarn over and bring the hook up and over to catch the yarn and bring it through the loop (this follows the slip-knot). This will be your first chain. You do not count the loop on the hook as chain. Keep going in the same manner, until you have the necessary number of chain stitches for your desired pattern. It might be necessary for you to keep practicing the chain stitch, until you are able to make consistent chains. This particular chain will be the foundation of your first row of crochet.

So, How Do Right-Handed and Left-handed Crocheters Differ?

There are some significantly important differences between left-handed and right-handed crocheters, which are listed below:

1) Left-handed crocheters work their stitches from left to right and right-handed crocheters work their stitches from right to left, when working back and forth in rows.

2) When working in rounds, however, left-handed crocheters work to the right (clockwise) and right-handed crocheters work to the left (counterclockwise).

3) Working back and forth in rows, the final, finished crochet project for either right-handed or left-handed crocheters will look exactly the same, except where the work began and finished.

4) When working in rounds, however, the finished crochet project will appear different for left-handed and right-handed crocheters.

5) Some people actually prefer left-handed crocheting-in-the-round! Others feel that it appears backwards!

6) Most of the changes that left-handed crocheters will have to make will be in reading and understanding the written patterns and the charts used in crochet.

7) There are many kinds of charts used in crocheting. Among these, there are 2 charts that might prove problematic for left-handed crocheters: color-specific charts and filet crochet charts.

8) In the case of color-specific charts, if the chart isn’t modified for left-handed crocheters, the finished product will be a mirror image of what it should be. In some cases, color placement can make a big difference here.

9) Reading filet crochet charts, on the other hand, can be a daunting task for just about anyone, at first. Those “filled-in” squares of the graph are referred to as blocks. Open squares are the “mesh” or spaces.

10) Charts are usually numbered by rows or stitches, and are usually written for the right-handers. For “lefties”, it will be necessary to amend the chart ever so much, prior to beginning. If you do not make these amendments to the chart, you’ll still be able to complete the project, but the finished piece may be reversed or backward. For color-specific charts, not always a huge issue. For filet charts, especially those that include wording, this could become a real problem. No one wants their wording to come out backwards!

Fortunately, most crochet instructions written today are fine for both right-handed and left-handed crocheters. Most of the patterns that will need to be amended will be clothing patterns. Sometimes, adjustments will be necessary for non-clothing patterns too. One example of non-clothing patterns adjustment, would be when you encounter an instruction like, “join yarn in upper right-hand corner”. In this particular instance, you would join the yarn in the upper left-hand corner, instead.


5 Comments


Storing Your Yarn Scraps

What Should You Do with Yarn Scraps?

Crocheters store their yarn scraps in all manner of ways, from bags or containers stuffed in whatever closet has room to a variety of creative storage bins made from buckets, boxes, crates or totes. For maximum efficiency, easily accessible cubicle-style storage units make it much easier to sort, store and locate scrap yarn colors when needed. Plastic crates make great storage units. They come in a variety of sizes, easily stack on top of each other and are a relatively inexpensive storage option.

Before setting up your choice of yarn bins, be sure to select a wise location, preferably in an unobtrusive place in your home where it’s cool, dry and clean. While you want the location to be handy for you, you do not want it to be accessible to pets and small children. Avoid places like an unfinished basement that can be vulnerable to water leakage or mold or a garage that houses dirty machinery, chemicals or little critters that might decide to nestle in or chew on your yarn.ColorWheel

Once you have selected a good location and set up your preferred type of storagebin unit, you need to sort your yarn scraps by color and value. A color wheel can be a great tool to help you do this. In order to see the true colors, lay the scraps out on a white or neutralcolor carpet or sheet. In looking at the color wheel shown here, you’ll notice that the colors are arranged in “families” by value, from lightest to darkest, so you should sort your yarn scraps in the same manner. Put each multicolored yarn in the pile with its predominant solid color. Put black, white, off-white and gray yarns in their own separate piles.

Once you have all of your color groups sorted, store them in the cubicles in whatever manner makes the most sense to you or is most workable for you. One way is to put the darkest-value shades of each color in the cubicles across the bottom row. Leave the column of cubicles on the right or left end free for the black, white, off-white and gray yarns.

In the corresponding cubicles across the next row, put the next darkest shade of each color—and so on—with each row, ending with the lightest-value shades in the top row (similar to how the color groups are arranged on the color wheel). If you have only a small amount of several colors, they may be able to share cubicles.

With a small investment in time and effort and a relatively low cost, you can have a wellorganized system for efficiently locating specific colors in your leftover yarns when you need them. In addition, being able to view all those wonderful colors in various shades at a glance will be sure to inspire lots of crochet creativity when planning your projects!

Leave a comment


Secrets of Seaming Success

Seaming Done Right

Whether joining afghan blocks or strips, or seaming a garment, the various pieces can be joined using one or more of several methods. Crocheting pieces together generally results in a stronger, more stable seam, while sewing often produces a lighter, less bulky seam.

Let’s look at some of the most common joining methods using afghan pieces as an example. You can choose a specific type of joining method that best suits your project, depending on the look you want or the strength that your design needs. Note that in photos, a contrasting color yarn was used for seaming for better visibility; for your project, use a matching color to help your seams blend in.

WHIPSTITCH IN ONE LOOP

One of the most common sewing methods for joining crocheted pieces is an overhand stitch, or whipstitch. Hold the pieces with right sides together and sew through the back loops (see Stitch Guide) only (see Photo A). Sewing through the back loops only gives a pretty result with the remaining loops, forming a subtle outline ridge on the right side of the work that defines each block or strip.

WhipstitchOneLoop

WHIPSTITCH IN BOTH LOOPS

If you prefer not to have a ridged outline around the pieces visible on the front side, sew through both loops of the stitches as shown here (see Photo B).

WhipstitchBothLoops

SINGLE CROCHET

For a raised ridge on the right side of your project, use a single crochet joining, holding the pieces with wrong sides together. The photo example is worked in the back loops only (see Photo C). This type of joining can also be worked on the wrong side if a decorative raised ridge on the front side of the project isn’t desired.

SingleCrochet

REVERSE SINGLE CROCHET

Joining pieces using reverse single crochet stitches produces a braided cord effect (see Photo D). As the name implies, you are working your single crochet stitches in reverse, or from left to right (righthanded) or right to left (left-handed).

ReverseSingleCrochet

SLIP STITCH ON FRONT SIDE

This joining creates an attractive chain stitch on the right side of the work. Place the pieces with right sides facing up and edges overlapping. Keeping the yarn behind the pieces, insert the hook through the back loop of each stitch to the back of the work and draw the yarn through all loops to the front of the work (see Photo E).

SlipStitchFrontSide

SLIP STITCH ON BACK SIDE

Slip stitching the pieces together from the wrong side will produce an almost invisible joining. This method is faster and easier than sewing and will keep the seams flatter and the stitches more even. Place the pieces together with right sides facing and slip stitch either through the back loops only (see Photo F) or through all loops, depending on whether or not you want an outline stitch to be visible on the right side of the work.

SlipStitchBackSide

SLIP STITCH & CHAIN

Using this seaming method gives a pretty lattice-type insert between the joined pieces. Holding the pieces with wrong sides together, simply slip stitch back and forth between the pieces, chaining two or three between and skipping one or two stitches on the motifs (see Photo G).

SlipStitch-Chain

Have fun experimenting with different joining techniques to give your project the right finished look and necessary stability. Knowing which technique works best for your project will help produce successful results time after time. To get you started, turn the page to find two bold and beautiful afghan projects that incorporate two of the seaming techniques discussed in this article.

1 Comment


Caring for Your Crochet Tools

Crocheters are usually pretty conscientious when it comes to taking care of their crochet materials, such as yarns, threads, books and magazines, but often don’t give much thought to their crochet tools. Here is some helpful information about caring for your crochet tools– hooks and needles, as well as some suggestions for which tools to use.

Crochet Tools |Aluminum vs. Plastic Hooks

Aluminum and plastic hooks are by far the most economical options in crochet hooks, but which is really the better purchase?

AluminumHooks

AluminumHooks

PlasticHooks

PlasticHooks

Aluminum hooks are strong, lightweight and smooth. They don’t bend or snag the yarn. Plastic hooks are often brittle, and the surface of the hook isn’t as smooth as aluminum. Plastic hooks can bend and even break and easily become pitted, which can cause snags that slow you down, resulting in nonuniform stitches. The jumbo plastic hooks are the exception to the rule—they are made differently, are excellent for large or bulky projects, and their design is satisfactory to their purpose.

Aluminum hooks can also become pitted over time from being dropped or stored carelessly. A snag on the hook will cause your yarn to pull and separate as you crochet. If your hook begins to snag your yarn, but you can’t see or feel any surface damage on your aluminum hook, try passing a piece of nylon stocking or another silky fabric over the hook; the slightest imperfection will snag the fabric.

Never try to correct the problem by sanding the aluminum hook. Discard it and get a new one.

Overall, even though they cost a little more, aluminum hooks are the better choice. You’ll find that in the long run, they are by far the most economical choice between the two. Being thrifty is wonderful, but most times, you get what you pay for. Always try to use the finest materials and tools your crafting budget will allow.

Caring for Your Crochet Tools

A great way to clean steel crochet hooks is to soak them in rubbing alcohol from time to time and dry them with a soft cloth. They’ll sparkle and give you a smoother stitching experience.

Beeswax, available at sewing-notion counters nationwide, is a great tool for keeping your hooks stitching smoothly. Try buffing your newly cleaned crochet hooks with beeswax, and they’ll zip through your crochet work!

Treat your wooden hooks as you would any fine furniture: Don’t use water! Clean them with wood oil and buff them with beeswax to keep the wood well-protected. Over time, wooden hooks will take on a satiny patina if they are cared for properly. This also will improve their performance and preserve them.

Due to the nature of a wooden hook, if it’s not made correctly or cared for properly, a wooden hook will sometimes split or snag your yarn. In this case, sand the hook carefully with superfine sandpaper, steel wool or the fine side of an emery board until it is smooth. Then, apply a coat of paste 74 Everything Crochet wax and polish, or you might apply one or two coats of clear varnish, sanding lightly between coats.

Care for bone hooks as you would plastic hooks, but never soak them in a soapy solution. Just clean them gently with a wet cloth, dry them thoroughly and then give them a good buffing with beeswax to keep them from drying out.

Keeping your crochet hooks cleaned and preserved is important, and so is storing them safely. Never throw your unprotected hooks in with the rest of your supplies. Keep hooks protected in a case made specifically for this purpose, or wrap them in felt.

TAPESTRY NEEDLE VS. YARN NEEDLE

Some pattern instructions call for a tapestry needle and some call for a yarn needle or even an embroidery needle. Each needle serves a specific purpose and is shaped to best do its job.

Left to right: embroidery needle, tapestry needles (second and third) and yarn needles (fourth and fifth)

Left to right: embroidery needle, tapestry needles (second and third) and yarn needles (fourth and fifth)

An embroidery needle has a sharp point designed for finer needlework and is not suggested for projects crocheted with yarn as it tends to split the yarn plies. A tapestry needle, with a point that is slightly less sharp, is used for tapestries, larger embroidery designs, finishing garments and some crocheted items. It has a large enough eye to accommodate fine and lightweight yarns.

Yarn needles, either plastic or steel, are a bit more blunted on the end, usually have a larger eye than tapestry needles and are perfect for conveying medium and bulky weight yarns. Yarn needles glide right through the stitches for perfect alignment and ease in working. Using a yarn needle ensures the best results for your heavier crochet projects.

When not in use, it’s best to keep needles in an appropriate storage case. While it might be tempting to stick your yarn or tapestry needle into a piece of furniture while working on a project, this can ultimately dull the tips of steel needles and might break plastic needles.

3 Comments


How to Successfully Start a Crochet Project

Beginning a crochet project successfully is key to ensuring positive results in the finished piece. Here are some helpful tips for getting your crochet projects off to a great start.

Prepare to Start a Crochet Project

If you think about it, a successful crochet project starts even before it actually begins! Preparation and planning are key elements to achieving success in any venture, and crochet is no different.

• Before beginning any new project, it’s important to carefully select and purchase all of the necessary materials. Sign up for a free membership at Free-Crochet and download a free crochet pattern. It’s rather frustrating to get a project nearly finished and then realize you cannot find one or more of the required materials. If you’re unsure about any of the materials, read through the pattern to see where and how each material is used. This should clear up any confusion.

Buy Correct Amounts of Crochet Materials

• It’s also extremely important to make sure you purchase an adequate quantity of each material, as indicated in the pattern. It can be very disheartening to have a partially or nearly completed project and then run out of something, only to discover you can’t find the same color or even the same material. It’s always a good idea to purchase a little more than the exact quantity the pattern calls for—just to be safe.

Mark Crochet Patterns

• Using a highlighter to mark special stitches and notes in the pattern before beginning is another good way to prevent setbacks. If your pattern uses unfamiliar stitches or stitch patterns, it’s a good idea to practice them before starting the actual project so that your work will be picture perfect! It can also be helpful to mark repeat symbols, joining instructions, turns, fasten-offs and color changes.

Practice Crocheting First

• To keep your beginning/foundation chain from being too tight (a very common problem in crochet work), try making the beginning/foundation chain with a hook that is one size larger than the hook size called for in the materials. Doing so will help ensure that your beginning edge is the same width as your ending edge.

• Before beginning an intricate motif or stitch pattern while you are working the project, first practice the motif or stitch pattern on its own using yarn and a large hook. This step can often be a big help in helping you familiarize yourself with the motif or stitch pattern, which in turn will prevent you from having to rip out your motif or stitch pattern multiple times.

• Most crocheters have a favorite way of working into the beginning/foundation chain. One way is to insert the hook only through the center of the V. Another way is to insert the hook through the center of the V and under the back bar. Another popular way is to work into the back bar (see illustration) of each chain.

BackBarOfChain1


These are just a few of the many ways you can ensure a successful journey to the end of your crochet project.

Leave a comment


The Savvy Single Crochet Stitch

By Karen Ratto-Whooley

Single Crochet Stitch or Double Crochet Stitches

The savvy single crochet is based on the American single crochet (UK/ International know it as the double crochet). By changing the placement of your stitches and using a larger size hook than you would normally with the yarn you are using, the fabric gives the look of knit, with a softer drape and feel.

Another feature of using this technique is that you use less yarn than you would in normal crochet. The larger hook size and the “taller” stitches allow your item to be completed more quickly too.

Originally, these stitches were found in the early 1990s in Afghanistan. Over the decades, there have been many who have tried to clarify and improve upon the stitches. What you will find here are three of the original stitches with clearer names and explanations. Once you learn the basic terminology, creating the stitches is easy!

TERMINOLOGY

As with learning any crochet technique, there are always new terms and abbreviations to learn. That is no different with the savvy single crochet. The table below includes all the terms and abbreviations that I will be using in this article.

WORKING IN THE END LOOPSPhotoA-EndLoops

Because in working these stitches you are always skipping the first stitch of the row (when working in rows), you will have to add a stitch to the end of each row. The skipped stitch of the previous row will create two visible loops called the End Loops (EL), shown in Photo A.


REAR BUMP OF THE CHAIN

In traditional crochet, the foundation row is worked with the front of the starting chain facing forward, shown in Photo B.

PhotoB

To create the base for the stitches, the starting chain is turned backward. You will notice in Photo C that there are loops/nubs coming through the center that join the chains together. These are the Rear Bumps or Back Bars of the Chain (RBC).

BackBarofChain


PhotoC1

WORKING IN THE REAR LOOP OF THE STITCH

In traditional crochet, stitches are worked on top of each other through the front and back loops of the stitches of the previous row/round, shown in Photo D.

PhotoD-BackFrontLoops

With these stitches, you will work your single crochets in the loop on the back side of the stitch just underneath the back loop of the stitch, shown in Photo E. This is the Rear Loop of the Stitch (RLS).

PhotoE-RearLoopStitch

LEARNING THE STITCHES

We will start off with this technique by learning three of my favorite stitches.

THE KNITTED SINGLE STITCH

KnittedSingleStitch

Ch 20.

Row 1: Work 1 sc in RBC of each ch across, turn. (20 sc)

Row 2: Ch 1, sc in RLS in 2nd sc from hook and in each sc across, sc in EL that forms at end of row, turn. Repeat row 2 for pattern.

THE V-KNIT STITCH

V-KnitStitch

Ch 20.

Row 1: Work 1 sc in RBC of each ch across, turn. (20 sc)

Row 2: Ch 1, sc in RLS and BOTH lps in 2nd sc from hook and in each sc across, sc in EL that forms at end of row, turn. Repeat row 2 for Pattern.

THE TWISTED STITCH

TwistedStitch

Ch 20.

Row 1: Work 1 sc in RBC of each ch across, turn. (20 sc)

Row 2: Ch 1, inserting hook from top to bottom, work sc in RLS in 2nd sc from hook and in each sc across, sc in EL that forms at end of row, turn. Repeat row 2 for pattern.

SOME TIPS TO KEEP YOU IN STITCHES

One of the hardest parts of the single crochet stitch technique is keeping the sides straight. There are some tips I can leave you with to prevent losing stitches.

1. Use stitch markers on either side to mark the End Loops. If you have these end loops marked with a different color marker on either side, you can also tell if you are on an even row or an odd row.

2. Don’t forget to skip the first stitch. This is the most common reason that a piece grows. Even when increasing, you still want to skip that first stitch because working in that first stitch is not only difficult, but it creates an edge that is not smooth.

3. Keep the turning chain loose. By keeping that turning chain loose, you can see that end loop much easier, not to mention that it will be easier to insert your hook in that space.

2 Comments


Drop-Stitch Mock Hairpin Lace

By Linda Dean

Read on for an easy method to simulate the beauty of hairpin lace using a drop-stitch technique- with no hairpin loom required! Create mock hairpin lace doilies or shawls.

What is Hairpin Lace?

Classic techniques of crochet may result in beautiful heirloom pieces of art, but some of those techniques can also be intimidating to many crocheters. One such technique is hairpin lace—the counting of loops on both sides of a loom to create multiple strips that are then attached together to create graceful, airy fabric.

Drop-Stitch Mock Hairpin Lace

While the end product is beautiful, the process can have many points at which errors can be made, and it can be difficult and time-consuming to fix the work. However, there are ways to reinvent this old classic and update it into more of the everyday type crochet. By utilizing the technique of using a drop stitch, a mock hairpin lace can be created. The drop stitch creates an open, airy stitch that can be worked in scarves or sweaters without the need to assemble strips as they are worked. Being able to directly stitch the lace into the piece without using a loom simplifies that process greatly.

Drop-Stitch Techniques

This stitch is worked best as an entire row to itself, because switching between the drop stitch and another type of stitch can become a little tricky to keep consistent row height. Fortunately, the drop stitch can be worked with any type of yarn and any hook size. And since, with this technique, the drop stitch is worked as a continuous piece and not strips like classic hairpin lace, it is easier to catch potential errors, such as miscounting the number of loops. It’s impossible to twist the strips while they are being worked, since there is no attaching necessary. Drop stitch can be utilized in a couple of different forms, and it can be started two different ways. You can begin with a chain and create an entire piece with a lacy opening, or you can work directly on a row of other stitches and use it as an accent area to create a unique design.

Drop-Stitch Mock Hairpin Lace

Drop-Stitch Mock Hairpin Lace

Mock Hairpin Lace Using Two Rows

When determining how you want to utilize this technique, keep in mind that it is a two-row technique; it takes two rows to complete the stitch. To create the drop stitch in the chain of a work (an entire piece worked in this airy stitch should begin this way) begin within the chain itself. Begin by chaining at least twice and then pulling through a long loop on the next chain; remove the hook and reinsert it into chain stitch behind long loop (see Photo 1). Yarn over and pull through a loop (be careful not to pull tension too tight and remove height from long loop). Chain at least twice and repeat until piece is desired length. Creating a unique accent piece, by mixing rows of various stitches and the drop stitch, is started by working into an existing stitch row (this is also the process for all subsequent rows of drop stitch throughout the piece). Insert the crochet hook into the desired location for the drop stitch and create a slip stitch, but pull the loop through about an inch.

Crochet Hairpin Lace

Remove the hook from the long loop and reinsert the hook into the base of the stitch (see Photo 2). Yarn over and pull through a loop (be careful not to pull tension too tight, which could remove height from long loop above—see Photo 3). Ch 1, slip stitch in next stitch and pull through a loop about an inch high, repeating the process (see Photo 4). Continue this across your row; there is no need to place a drop stitch in every stitch across as more spacing can be created by placing a slip stitch in between drop stitches. Row two begins upon reaching the end of the drop-stitch row and chaining enough to meet the height of the loops, and if necessary, the slip stitches at end of row below. Insert hook into the long loop and chain through both loops (see Photo 5) using a chain stitch wherever you may have a slip stitch continuing across the row (see Photos 6 and 7).

Dropstitchpic7

3 Comments