
CROCHET POCKET TYPES
Crochet pockets can be a useful addition to any sweater. Not only are they practical, but they can also add a bit of detail to an otherwise plain sweater. The most common pocket types are patch, horizontal slit or vertical slit.
Patch pockets (see Photo A) are simple square or rectangular pieces which are crocheted first, and then sewn onto the sweater fabric. While the patch pocket may be the easiest to make, you must use extreme care when sewing the crochet pocket onto the fabric. The seam should be nearly invisible, and the crochet pocket must be placed exactly on the grain of the fabric.
Horizontal-slit or vertical-slit crochet pockets, also known as horizontal-inset (see Photo B) or vertical-inset pockets, have a single or double lining which is crocheted first, and then incorporated into the body of the sweater as it is worked. The double lining is generally used for finer-gauge fabrics and does not require that the inside of the pocket be sewn onto the sweater. The single lining is better suited for heavier yarns and must be sewn onto the wrong side of the sweater fabric. A pocket-opening border is usually added after the sweater is complete. This type of pocket has the advantage of being mostly hidden — the only part of the pocket that shows once the crochet sweater is completed is the border. The crocheter who is uncomfortable with finishing work on the “public” side may be more satisfied with an inset pocket.
Photo A
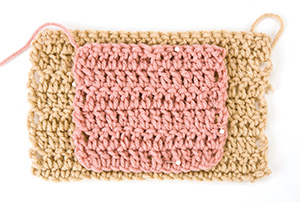
PATCH CROCHET POCKET
- Crochet a piece of fabric to the desired size and shape. Use a simple square or rectangle, and experiment with unusual shapes or motifs, or try a 3-D piece.
- Pin the pocket onto right side of the crochet sweater. Take care to pin it straight both horizontally and vertically.
- Working on the right side, invisibly stitch the pocket onto the crochet sweater. For a decorative look, try a whipstitch or a blanket stitch using a contrasting color of yarn.
Photo B
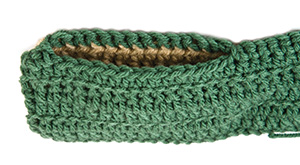
HORIZONTAL-INSET CROCHET POCKET
- Crochet the pocket lining in either the pattern stitch used in the sweater or in single crochet. The pocket lining should be unobtrusive yet functional. Stay away from any pattern stitch that will add excess weight or texture, or any that is too “holey” to be practical.
- Crochet the sweater to the desired length. The pocket should be positioned so that it is comfortable for the wearer’s hand. The placement of special or decorative pockets, such as a watch pocket, may be somewhat different.
- Referring to the crochet sweater directions, work in the pattern the required number of stitches until you get to the pocket opening. Sometimes crochet pockets are placed in the center of the piece, and sometimes to one side. The pattern instructions will state how many stitches to crochet.
- Holding the pocket piece behind your work-in-progress, crochet in pattern across the top of the pocket piece rather than into the main fabric. The number of stitches you work across the pocket and the number of stitches you skip on the main-fabric will probably be the same as the number you used in your pocket lining.
- Continue working into remaining fabric stitches to the end of the row, keeping in the established pattern. At this point, you have joined the pocket lining to the fabric of the crochet sweater. There is a hole in the main fabric and the lining is loose against the back of the fabric.
- Continue crocheting the sweater as directed. Then fasten off your yarn.
- When the crochet sweater is complete, work the desired border (if any) along the top front pocket edge.
- Sew the side and bottom edges of the crochet pocket lining to the back of the fabric. If necessary, sew side edges of the border to right side of fabric.
VERTICAL-INSET CROCHET POCKET
- Crochet the sweater to the desired length between the bottom of the sweater and the bottom of the crochet pocket, ending with a wrong-side row.
- Referring to the sweater directions, crochet in the pattern across the required number of stitches to make the pocket opening, leaving remaining stitches unworked. Vertical crochet pockets are placed so that they lie toward the center of the garment. The crochet sweater pattern’s instructions will state how many stitches to work.
- Turn the work and continue to crochet in pattern on the stitches just worked until the sweater reaches the desired height of the pocket opening, ending with a wrong-side row. Drop the loop from the hook. Do not fasten off. Place a pin in the stitch as a holder.
- With a new strand of yarn, chain the number required to match the width and stitch pattern of the crochet pocket front, turn and work the first row of the stitch pattern. Turn and place a marker. You will end by crocheting a right-side row. The stitch pattern used for the pocket lining should have the same row gauge as the main fabric.
- With the same yarn, crocheting in the stitch pattern, work in the pocket lining stitches and in unworked stitches from sweater body, turn.
- Crochet in the stitch pattern across sweater body and pocket lining, turn. Continue working as stated until sweater body and pocket lining match height of pocket front, ending with a wrong-side row.Fasten off.
- Put the dropped loop back on the hook. Leaving pocket lining stitches unworked, crochet in the stitch pattern across the pocket front stitches and across stitches on the crochet sweater body.
- Continue crocheting sweater as directed.
- When sweater is complete, crochet the desired border, if any, along the front edge of the crochet pocket.
- Sew side, top and bottom edges of the pocket lining to the back of the fabric. If necessary, sew the top and border edges of border to right side of fabric.